Please support us by disabling your ad-block. The revenue help us create more content for the community.
Vultr Object Storage is flexible and scalable storage that supports the S3 API. It's very reliable, scalable, and high-performance storage enabling you to store infinite use cases such as images, audio, video, backing up data, and more.
In this article, you'll learn how to get started up and running with Vultr Object Storage on Laravel 8 Application using Flysystem integration from scratch. Do follow along with the code example below and let's build a simple image upload application that will directly store the image into Vultr Object Storage.
First thing first, install the new Laravel 8 application and the necessary dependencies for this guide. This is very straightforward instruction but make sure to have all the prerequisites above ready.
# create new laravel application called "image-uploader"
laravel new image-uploader

# change into the project directory
cd image-uploader

# install flysystem adapter for AWS S3 SDK v3.x and intervention image package
composer require league/flysystem-aws-s3-v3:~1.0 intervention/image

# run PHP local server to serve the application
php artisan serve

# open project in Visual Studio Code or other IDE
code .
Environment and Configuration
The Laravel .env (environment) configuration is where the Vultr Object Storage credentials is defined. Create a new key and value pair like below at the end of the .env file and copy out the value from your Vultr Object Storage dashboard panel.
# update the filesystem driver that will be used
FILESYSTEM_DRIVER=vultr

# define new key-value pair for vultr object storage credentials
VULTR_ACCESS_KEY=PASTE_YOUR_VULTR_ACCESS_KEY_HERE
VULTR_SECRET_KEY=PASTE_YOUR_VULTR_SECRET_KEY_HERE
VULTR_REGION=ewr1
VULTR_BUCKET=PASTE_YOUR_BUCKET_NAME_HERE
VULTR_ENDPOINT=ewr1.vultrobjects.com
Below is the screenshot to illustrate the location of where you can create the Object Storage as well as the location of where you can get the credentials and bucket name.Vultr Object Storage dashboard panel Vultr Object Storage credentials Once the environment variable is set, define a new filesystem disk configuration like below. Do note that "s3" driver will be used since Vultr Object Storage is s3 compatible.
You may also need to clear the config cache by running `php artisan config:clear` to remove any configuration that has been previously cached.
Interacting Vultr Object Storage with Laravel Filesystem
To interact with the configured disk, Laravel provide the `Storage` facade where you can call several predefined methods to perform various actions.
Simple Command
Below are some of the basic command to check if file exists, put contents into a file, and get the content of a file in the object storage. You can run the code below by using the Laravel Tinker tool.
# launch Laravel Tinker (REPL) tool
php artisan tinker

# declare the namespace Laravel tinker will use
use Illuminate\Support\Facades\Storage;

# obtaining disk instance (if not specified will use default disk instance defined in config / environment settings)
Storage::disk('vultr');

# put "Hello world!" content into "welcome.txt"
Storage::put('welcome.txt', 'Hello world!');

# get the content of "welcome.txt"
Storage::get('welcome.txt');

# check if "welcome.txt" exists
if (Storage::exists('welcome.txt')) {
    # download the "welcome.txt" file
    Storage::download('welcome.txt');
}
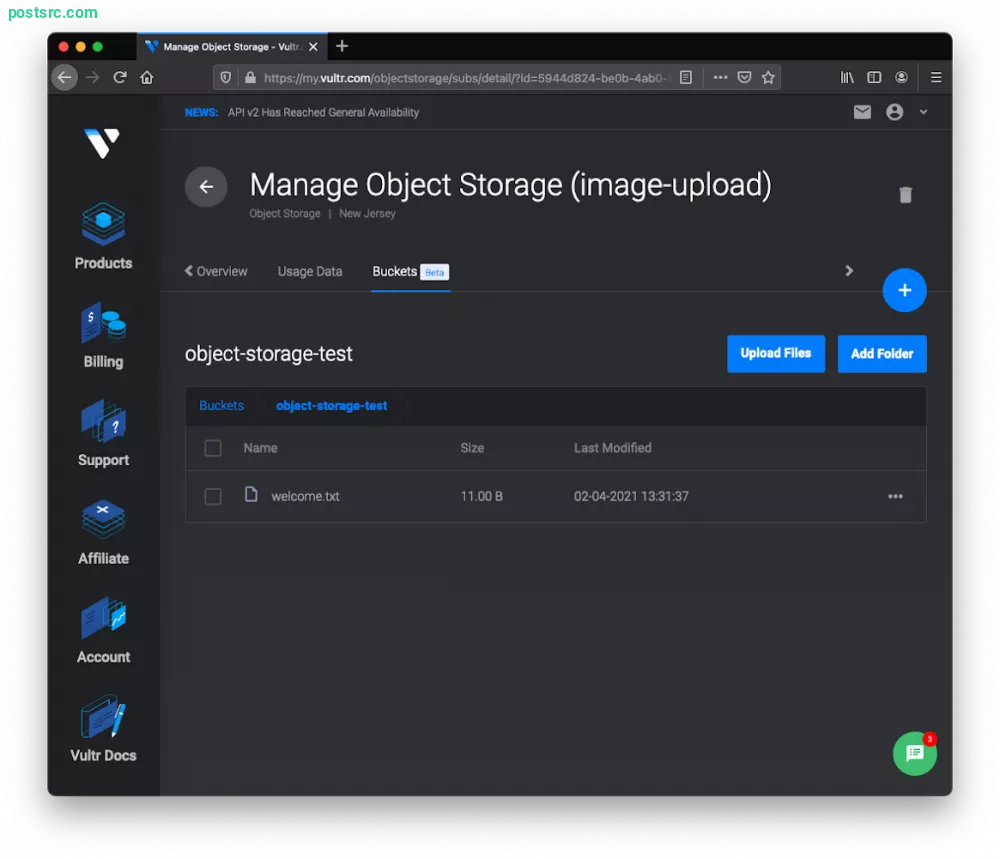
Below is the screenshot to illustrate the files that have been uploaded to the Object Storage bucket. The content of "welcome.txt" will be "Hello World!".Upload a file into Vultr object storage bucket To learn more on the available methods that you can use to interact with the Object storage, you may refer to [Laravel File Storage documentation](https://laravel.com/docs/master/filesystem) where each of the methods is being documented in a detailed manner.
Simple Image-Upload Application
Now that you have seen the basic command, let's create a simple **image-upload application** that will make use of Laravel model-view-controller (MVC) architecture as well as leveraging Vultr Object Storage.
Let's get started by defining the command to generate the Laravel model and controller that will be used. You may name it however you want but we recommend that you follow along with the example.
 # generate the necessaary model and migration
php artisan make:model Image -m

# generate the necessaray controller
php artisan make:controller ImageController

php artisan make:controller HomeController
Routes
For this simple application, it will only need 2 routes where the first 1st is for the home page view and the 2nd one is to handle the image uploading to Vultr Object storage and save the image path in the database.
 <?php

use Illuminate\Support\Facades\Route;
use App\Http\Controllers\HomeController;
use App\Http\Controllers\ImageController;

Route::get('/', [HomeController::class, 'index'])
    ->name('home');

Route::post('images', [ImageController::class, 'store'])
    ->name('upload-image');
Migration
When using the `-m` flag to generate the Laravel model, the command will automatically generate a migration file for the associated model as well. Below are the columns that have been defined for the migration.
Schema::create('images', function (Blueprint $table) {
    $table->id();
    $table->string('name');
    $table->string('path');
    $table->timestamps();
});
Run the migration by running `php artisan migrate`.
Model
For the image model, add a fillable property to make the Image model column mass assignable.
 /**
  * The attributes that are mass assignable.
  *
  * @var array
  */
protected $fillable = [
    'name',
    'path',
];
Views
There will only be one view and this is essentially the front-end part of the application. The form will be on this page and upon submission, the uploaded image will appear at the bottom of the page as a thumbnail unless errors occurred when uploading the image files.
Below is the homepage of the application. By default when there are no images uploaded the bottom section will be empty.Homepage
Controller
The logic is stored in the controller and on the main page it query the database to check if there are any images available. If there's one then it will be retrieved from Vultr Object Storage and returned to the home page view.
Home Controller
<?php

namespace App\Http\Controllers;

use App\Models\Image;
use Illuminate\Support\Facades\Storage;

class HomeController extends Controller
{
    public function index()
    {
        $images = Image::query()
            ->get(['name', 'path'])
            ->flatMap(function ($image) {
                if (Storage::exists($image->path)) {
                    return [
                        $image->name => Storage::url($image->path)
                    ];
                }
            });

        return view('home', compact('images'));
    }
}
On the home page, the form will point to the ImageController where the image processing happens. The uploaded file is validated against rules that will ensure it's required and only image file type is uploaded. Once it passes the validation, the name is randomized and the right extension will be used to generate a unique file path which will eventually be stored in the database. In the case of this tutorial, the file is publicly stored in the bucket so that means it's accessible everywhere.
Image Controller
<?php

namespace App\Http\Controllers;

use App\Models\Image;
use Illuminate\Support\Str;
use Illuminate\Support\Facades\Storage;

class ImageController extends Controller
{
    public function store()
    {
        $hasImagesDirectory = Storage::exists($directory = 'images');

        /* create directory if not exist */
        if (! $hasImagesDirectory) {
            Storage::makeDirectory('images');
        }

        /* validate the request to make it required and only accept image file */
        $image = request()->validate(['image' => ['required', 'image']])['image'];

        /* randomise uploaded image name and apply the extension */
        $fileName = Str::random(4) . '.' . $image->getClientOriginalExtension();

        /* store the image to vultr and retrieve the file path */
        $filePath = $image->storePubliclyAs(
            $directory,
            $fileName,
            'vultr'
        );

        /* save the record to the database */
        Image::create(['name' => $fileName, 'path' => $filePath]);

        return redirect()->route('home');
    }
}
The screenshot below shows the uploaded images successfully loaded from the Vultr Object Storage bucket. Homepage with uploaded images When you visit the bucket in the Vultr dashboard by right you will see all of the uploaded images inside the images directory.Vultr Object Storage page with uploaded images